
Your Complete DIY Potting Bench Plans
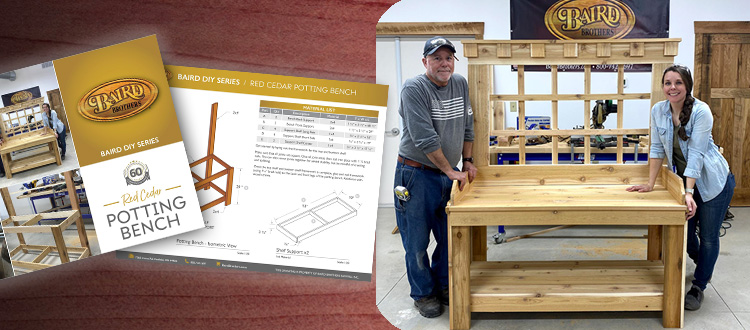
Have you been eyeing up that potting bench at your local garden center but wish you could make one on your own? Look no further. We’ve got everything you need–including free DIY potting bench plans and the products used throughout the build–to complete this great weekend project!
Check out our complete video tutorial first:
Then, download the FREE printable potting bench plans, which include the cut list and the tools needed for the project.
How to Build a Potting Bench: Getting Started
A cedar potting bench is great for planting season, but is also functional and decorative. While many gardeners prefer to use western red cedar, a potting bench can be made from a variety of wood species as long as a weather-resistant finish is used to protect the final product. Even better, there is no need to be a woodworking expert to complete this DIY project; infact, a workbench like this can be completed with very few tools and limited experience. Not into gardening but have an outdoor space that needs some attention? A potting bench can always double as an outdoor bar or grill cart, which means that this customizable yet easy DIY project can complement your existing outdoor furniture while being functional at the same time.
Tools Needed for the DIY Project
Waterproof wood glue Brad nailer 1 ¼ Brad nails 1 ½ Brad nails Combination square Tape measure Cordless Drill 1 ½ screws Clamps (optional) Kreg Pocket-Hole Jig 720PRO (optional) Miter saw or circular saw (if not buying a pre-cut potting bench package from Baird Brothers Fine Hardwoods)
Cut List/Materials List
2×4 Bench Back Support: (2) pieces, 68 ½” each
2×4 Bench Front Support: (2) pieces, 29” each
1×4 Support Shelf Long Side: (4) pieces, 53” each
1×4 Support Shelf Short Side: (4) pieces, 19” each
1×4 Support Shelf Center: (2) pieces, 17 ½” each
1×5 Bottom Shelf Plank: (4) pieces, 53 ¼” each
1×6 Top Shelf Plank: (4) pieces, 53 ¼” each
1×4 Side Trim: (2) pieces, 68 ½” each
1×4 Side Trim: (2) pieces, 29” each
1×4 Front Face: (1) piece, 53”
1×6 Top Backsplash: (1) piece, 54 ¾”
1×6 Bottom Backsplash: (1) piece, 54 ¾”
1×6 Side Backsplash: (2) pieces, 27 ½” each
1×6 Topper: (1) piece, 57 ¾”
1×2 Horizontal Lattice: (4) pieces, 45 ¾” each
1×2 Vertical Lattice: (4) pieces, 30 ½” each
1×6 Top Shelf Wings: (2) pieces, 20” each
1×1 Nailers: (2) pieces, 20” each
1×1 Nailers: (2) pieces, 4 ½” each
1×4 Dentil Moulding: (9) pieces, 3 ½” each
Don’t want to make all of these cuts on your own? You can purchase a precut lumber kit by visiting Baird Brothers Fine Hardwoods!
*Notes before getting started on your garden potting bench:
-
- Be sure to drill pilot holes into the lumber before inserting screws (to ensure that the wood won’t split).
- Keep pilot holes about ½” from edges of lumber (to avoid splitting)
- Glue at every wood intersection where the potting bench is nailed/screwed.
Step-By-Step Instructions for Your Own Potting Bench
Once the lumber from the cutting list mentioned above is ready, it’s time to get started with the build. Again, you don’t need to be an experienced woodworker, and free plans for this DIY project are available here! If not purchasing a pre-cut potting bench lumber package from Baird Brothers Fine Hardwoods, measure all lumber and cut pieces to length, following the cut list provided above.
Step 1: Build the Framework/Shelving
Lumber needed for this step:
1×4 Support Shelf Long Side: (4) pieces, 53” each
1×4 Support Shelf Short Side: (4) pieces, 19” each
1×4 Support Shelf Center: (2) pieces, 17 ½” each
Get started by laying out the framework for the top and bottom shelf.
If using cedar, note that there is a milled face and a natural rough face to each board. In our video tutorial, we chose to keep the rustic side turned out, but the final decision is up to you! Keep in mind that rough cedar is really brought to life once a protective coating is added to the finished potting bench.
Make sure that all joints are square. Glue all joint areas then nail into place with 1 ½ brad nails. You can also screw joints together for added stability, but be mindful of cracking and splitting (*see notes before getting started).
Step 2: Attach Legs to Top Shelf and Bottom Shelf
Lumber needed for this step:
2×4 Bench Back Support: (2) pieces, 68 ½” each
2×4 Bench Front Support: (2) pieces, 29” each
Once the top shelf and bottom shelf framework is complete, glue and nail framework (using 1½” brad nails) to the back and front legs of the potting bench. Reinforce with wood screws.
Step 3: Test Fit and Attach Shelf Boards – Lower Shelf
Lumber needed for this step:
1×5 Bottom Shelf Plank: (4) pieces, 53 ¼” each
Dry fit all four boards that will be used for the surface of the bottom shelf (being careful to leave some space between boards for soil and debris to drop through). Drill pocket holes, apply glue to joints, nail boards to the framework with 1½” brad nails and screw into place for additional reinforcement.
Step 4: Test Fit and Attach Shelf Boards – Upper Shelf
Lumber needed for this step:
1×6 Top Shelf Plank: (4) pieces, 53 ¼” each
Repeat Step 3’s process again for the top shelf slats (but position boards flush against one another so that there are no gaps between boards).
Step 5: Add Trim Pieces To Front Legs and Backsplash
Lumber needed for this step:
1×4 Side Trim: (2) pieces, 68 ½” each
1×4 Side Trim: (2) pieces, 29” each
1×4 Front Face: (1) piece, 53”
1×6 Top Backsplash: (1) piece, 54 ¾”
1×6 Bottom Backsplash: (1) piece, 54 ¾”
1×6 Side Backsplash: (2) pieces, 27 ½” each
1×6 Topper: (1) piece, 57 ¾”
Attach end caps/trim to sides and front face of the potting bench with waterproof wood glue and 1½” brad nails. Then attach top and bottom back splash, again using 1½” brad nails and wood glue.
Step 6: Complete the Assembly with Lattice and Decorative Elements
Lumber needed for this step:
1×2 Horizontal Lattice: (4) pieces, 45 ¾” each
1×2 Vertical Lattice: (4) pieces, 30 ½” each
1×6 Top Shelf Wings: (2) pieces, 20” each
1×1 Nailers: (2) pieces, 20” each
1×1 Nailers: (2) pieces, 4 ½” each
1×4 Dentil Moulding: (9) pieces, 3 ½” each
Complete the look of your DIY potting bench by adding decorative elements like dentil mouldings and lattice.
For that dentil mouldings that will be used at the top of the backsplash, attach a moulding to the outer edge of both sides of the potting bench. Then, measure spacing (starting from the edge of the newly attached mouldings in order to find the center). Once measured, nail all four corners of the dentil moulding elements to the top of the bench.
Next, mark spacing for lattice trim with a pencil on the back side of the potting bench. Then, attach lattice trim, again, gluing and nailing each piece of moulding into place.
To complete the project build, add the top shelf’s wings to the left and right sides of the top shelf. Attach with wood glue and place shoe moulding on the outside of the wings, securing with 1¼” brad nails.
Once the build is complete, your potting bench is ready to be stained or painted for an additional layer of weather protection. This potting bench design offers a large enough work surface for flats and baskets, along with any garden tools needed. If you don’t have a green thumb, this particular project can also double as an outdoor bar or grill cart, with plenty of room for all of your summertime essentials!
Order Your Pre-Cut Potting Bench Lumber Package To Save Time!
Love the project plans but don’t have the time or tools to cut the lumber to length yourself? Order a pre-cut lumber package direct from Baird Brothers Fine Hardwoods and complete the project without having to use a miter or circular saw. For more great projects, information, tips and tricks, follow along with our YouTube channel or visit us at bairdbrothers.com!

