
Reviewing Antique Woodworking Tools: A Conversation With Vintage Tool Collector Mike Jenkins
Note: this is a transcript from our recent AHA interview. If you would like to watch the full video, check out our content studio page. This interview is also available as a podcast episode – find it here.
Steve Stack:
Brought to you direct from Studio 3B at Baird Brothers Fine Hardwoods, American Hardwood Advisor is your source for trends, tips, and insights into how the building industry has evolved.
Join me, Steve Stack, along with guest builders and industry leaders, as we talk shop and go in-depth on what it takes to be the best of the best.
Dive into topics like architecture, industry trends, project plans, historical tools, tricks of the trade, and life lessons from more than six decades of experience in the hardwood lumber business.
Learning About Old Woodworking Tools
Steve Stack:
Welcome back, everybody. I’m Steve Stack from Baird Brothers Fine Hardwoods back here at one of our favorite places, Studio 3B. Today we have one of our favorite people back in the studio, Mr. Mike Jenkins. Mike, welcome back.
Mike Jenkins:
Thanks, sir.
Steve Stack:
I appreciate it.
Mike Jenkins:
I love to talk about woodworking tools.
Steve Stack:
And you’re so good at it! We love having you. Every time you step foot on this property, we learn something. Today, on the beautiful woodworker’s bench that we call an interview desk, we have an array of hand tools laid out. We’re going to learn from your expertise as you walk us through some of these tools. When it comes to guys and their shops, I’m sure you’ve heard the old adage, “The guy with the most tools wins.”
Mike Jenkins:
I’ve heard that.
Steve Stack:
Back in the day, you used to see those big workboxes or trunks. That was the guy’s livelihood.
Mike Jenkins:
A big tool chest.
Steve Stack:
The old tool chest. It would go from job to job. If he needed it, it traveled with him. So that’s cool. We’ve picked some different tools from our collection. I know you can give me the date, when was Stanley Tools formed?
Mike Jenkins:
I think it was originally established around 1850. They’re still in business, but I don’t think they make many woodworking tools now.
Steve Stack:
I have a 2022 Stanley tape measure.
Mike Jenkins:
Yes. It was probably not made in America.
Steve Stack:
Very possible. This is my favorite, though. That’s the only thing you’ll see hanging on my belt. We have some cool stuff laid out on the desk.
Mike Jenkins:
Yeah. A crate hammer, used to open up crates. On one side it says “Tomahawk,” which was the name of the product. On the back, it says it was made by the Bridgeport Hardware Company. Bridgeport made a lot of them. The hammer part is intended to hammer the lid back on the crate. The other side of it is designed so you can pry it open if you need to. The hatchet is if you need to do some trimming. There are also two nail pullers.
Steve Stack:
You could find a crate hammer just about anywhere, but likely with dock workers or warehouse workers.
Mike Jenkins:
Warehousemen.
Steve Stack:
Right?
Mike Jenkins:
Yes.
Steve Stack:
So you have four, possibly five tools all in one.
Mike Jenkins:
Yes. It’s a multi-tool.
Steve Stack:
Yes. Hang it on the belt hoop on your blue jeans and go to work.
Mike Jenkins:
Yeah.
Steve Stack:
That and a lunchbox is all you’d need for a day. Let’s look at another striking instrument.
Hatchets and Stanley Levels
Mike Jenkins:
This is another edge tool. It’s a small hatchet, possibly used around the house to chip up kindling for a wood-burning stove in the kitchen. It could have a dual purpose. It also has a peen so that you can hammer a nail if you need to. Sometimes you’ll see them with a little notch cut out as a nail puller, but yours doesn’t have that feature.
Steve Stack:
We didn’t find any identifying marks on that.
Mike Jenkins:
No.
Steve Stack:
Around what time would it have been made?
Mike Jenkins:
It’s hard to date that. It could be as early as 1880 or it could be 1920. That’s a pretty wide range.
Steve Stack:
Either way, it has some age to it.
Mike Jenkins:
Oh, yes. Well, 1920 is a hundred years old.
Steve Stack:
Yeah, exactly. There’s a Stanley level sitting in front of you. When did Stanley levels come about?
Mike Jenkins:
The patent date says 1894. You have the number 95. It looks like it’s about 24 or 26 inches long. I would say this is probably a cherry body. The interesting thing about this level is that it’s brass bound. It has brass on the ends and all of the edges. There’s a little piece of brass there that keeps the wood from wearing down too much. It has bubbles so you can use it to see if the door jamb is right. You can make sure that whatever you’re measuring is level.
Steve Stack:
So plum and level. Along with that, we have a smaller one we want you to look at.
Mike Jenkins:
Yes. It’s another, much smaller level that’s very lightweight with an aluminum body. It would be suspended simply from a string. It was a means of determining whether the string at that end and this end are at the same height. It was possibly used in bricklaying or something like that.
Steve Stack:
That’s nice for long distances if you need two points to generate a horizontal, level line.
Mike Jenkins:
The one you have here is nice because it’s in the original tin container.
Vintage Tools for Carpentry
Steve Stack:
So let’s say we have everything level and we’re ready to move on in our project. One of the other woodworking or carpentry necessities is a square.
Mike Jenkins:
Yeah. You need to make sure the wood is square. You use a tool on the edge of a board. If you can see daylight underneath the edge, it’s not square. Then you get your hand plane out and keep working at it until no daylight comes through.
Steve Stack:
All right. Let’s shift gears and say we’re looking for bracing inside cabinetry or we’re looking at rafter cuts.
Mike Jenkins:
Okay.
Steve Stack:
Tail cuts. Another tool might come into play.
Mike Jenkins:
Yeah. This is another example of a bevel, made by Stanley. It’s a little larger than most, but if you’re doing rafter work and need to cut duplicates, you set this at one angle and now your marks and angles are going to be exactly the same.
Steve Stack:
You leave it at that angle, don’t mess with it, and you have a template gauge for all of your tail cuts.
Mike Jenkins:
If you are a good sawyer, all of your cuts will be true.
Steve Stack:
Okay. You mentioned cutting. And this, as far as what’s on the table right now, is one of my favorites. Stair parts and components are a very important part of the products that we manufacture here at Baird Brothers. Stairs can be considered the nucleus of a home. A nice set of stairs has to have precision construction installation. Back in the day, they knew how to do it.
Mike Jenkins:
They used what is called a stair saw. It has an adjustable depth blade. If you loosen up the two screws, you can adjust the blade to be half an inch more, maybe three-quarters, or you can recess it to a quarter-inch or so. Its purpose was to cut two parallel lines in the stringers of a stairway so that the stair treads would fit into it. This was an essential component for a house carpenters’ toolkit. You had to have it.
Steve Stack:
Yeah. If you were a stair builder, you wanted one of those. Today, people use a router.
Mike Jenkins:
Yes.
Steve Stack:
A router and a template to begin dadoing into the side of the stringer or skirt board. This way you get good engagement from the step tread into the stringer or skirt board. That helps accomplish a nice, quiet set of stairs when traveled upon. They recognized that back in the day.
Mike Jenkins:
The depth has to be consistent because you want all of your stair treads to be the same width. If your dados are a little deeper over here or a little shallower there, the same size tread isn’t going to fit. You need to have uniform stair tread width.
Steve Stack:
This brace is another one of my favorites because of how delicate it is. There are braces of all sizes and shapes, but the one we have here would’ve been more of a furniture maker’s or a carpentry type of brace.
Mike Jenkins:
I would agree. They call it an unplated brace. Sometimes you’ll find them with some brass reinforcement. That’s called a plated brace. This is unplated but it has a brass chuck. This one actually has a countersink bit. Once you drill your hole, it can countersink a space for the screw to sink in and not be proud of the work surface.
Steve Stack:
You mentioned wood screws. For anybody that has ever worked with antique furniture, the wood screw shape was very common and consistent. If you look at the head of the bit, it’s set up perfectly for the tapered wood screw.
Mike Jenkins:
The tapered head.
Steve Stack:
The flan shoulder and then the flat head. By using that bit, you have a specialty screwdriver for installing wood screws.
Mike Jenkins:
Yes.
Steve Stack:
Interesting.
Mike Jenkins:
This is probably English-made. They didn’t make too many of them in the US. Most of them were made in England.
Steve Stack:
So this was made in the mid to late 1800s?
Mike Jenkins:
Mid 1800s. Somewhere around 1850 or 1870.
Steve Stack:
Interesting. So with the age, delicacy, and grain orientation, you would think it would have two weak points.
Mike Jenkins:
They are and that’s what the brass reinforcement was for.
Steve Stack:
Originally?
Mike Jenkins:
Yeah.
Steve Stack:
Well, we’re lucky we found this one intact.
Mike Jenkins:
Right.
Evolution of Wood Carving Tools and Planes
Steve Stack:
You brought a piece today from your tool collection that fits well with Baird Brothers Fine Hardwoods moulding manufacturing.
Mike Jenkins:
This is called a cornice plane. The bottom is not square to the sides. It has a shaped edge used to cut decorative moulding. It has a hole in the middle, possibly for an apprentice rope. If you’re using this on a piece of wood, it takes several passes before you get deep enough to get the entire profile. It takes a lot of energy. The master craftsman has the handle and guides the plane. Another person will help by pulling along the length of the board that you’re cutting. This is probably an 1840s profile that you’d see on a piece of furniture.
Steve Stack:
That’s similar to the crown mould plane that you’ve shared with us. You mentioned using a rope through that particular cornice mould but on the crown plane-
Mike Jenkins:
There were handles.
Steve Stack:
There were handles for the apprentice or the helper.
Mike Jenkins:
The handle would probably be beneficial for stability.
Steve Stack:
Control.
Mike Jenkins:
Yes. Originally there may have been a handle that went in here instead of a rope.
Steve Stack:
Interesting. There was nothing easy about making mouldings back in the 1800s.
Mike Jenkins:
It was a time-consuming, labor-intensive process.
Steve Stack:
Everything from a stack of air-dried rough sawn lumber, that’s where you started.
Mike Jenkins:
A scary process to think of today.
Steve Stack:
Okay. What would you do after receiving that stack of rough sawn lumber?
Mike Jenkins:
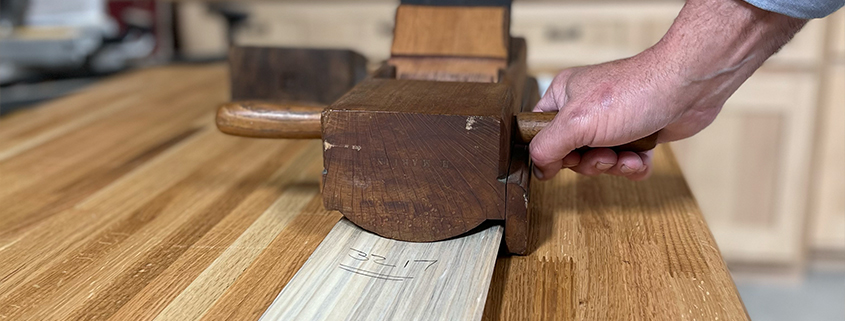
The first step is going to use a hand plane. This originally would’ve had a horn up another inch and a half. The purpose was to go through and roughly smooth the saw curve out of the sawn lumber that came from the sawmill. It won’t necessarily give you a smooth surface, but it’s smooth enough that you could use a regular bench plane to flatten it out and get it ready for preparation.
Steve Stack:
Okay. Now we have the first layer of saw curves knocked down. A couple of things are a layout man’s friend for creating straight lines. One is a string. After I accomplish a straight edge, I want a consistent width. What type of tool would you use to lay markings down for a consistent width?
Mike Jenkins:
A panel gauge, but this one has a sharp point and an adjustable fence. You can lock the fence in place on the stem and then you can draw this down. Assuming you have one straight edge, you put the gauge over that edge.
Steve Stack:
That’s your fence guide.
Mike Jenkins:
Yes. Then you can mark the board and the width. Next would be to go ahead and saw it to width.
Steve Stack:
After you have a consistent width, you’re ready for your cornice moulding cutter or your crown mould cutter.
Mike Jenkins:
Well, you have to make sure it’s square. We had the square in there too.
Steve Stack:
Yeah. We have another marking gauge.
Mike Jenkins:
This is called a mortise gauge, not a marking gauge. It originally had two little points here. It’s an adjustable tool so I can move this one point. It would be used to mark out a mortise. A mortise is a rectangular or sometimes square hole that a tenon would fit into where you needed to have the edges of the mortise marked. This is the mortise gauge that would be used for that.
Steve Stack:
Interesting. So the size of your stock or tenon would determine the size of the mortise hole.
Mike Jenkins:
Yes.
Steve Stack:
And that’s all adjustable.
Mike Jenkins:
Yes.
Steve Stack:
Very interesting.
From Scrapers to Sandpaper
Steve Stack:
Do you know a guy by the name of Red? I have a buddy named Red, but he’s not a carpenter.
Mike Jenkins:
I know what Red owned, this tool that he carved his name into.
Steve Stack:
Red was pretty proud of that.
Mike Jenkins:
This is a spokeshave. It’s a little nicer than others because it has an adjustable feature on the blade. You can modify how thick of a shaving you’re going to cut with these screws. In the old days, when everyone was showing up, you might have half a dozen carpenters working in a house and everyone had a spokeshave. Well, Red carved his name in this one to make sure that, by golly, no one else went home with Red’s spokeshave.
Steve Stack:
Just as a reminder, this podcast is also available on YouTube. Watch and see the antique tools we’re talking about. Visit our content studio to see everything from Studio 3B and our workshop. Mike, we’ve only just begun talking about tools with you. We have more stuff coming up.
Mike Jenkins:
I look forward to it.
Steve Stack:
We have a bunch of stuff to cover. We’re going to talk about tools used in post and beam construction to some of the finished carpentry tools and furniture building tools that we’ve seen. One of the neat things that you made us aware of was the group of users that are out there using these tools today to recreate some of the vintage mouldings and furniture pieces.
Mike Jenkins:
They are even craftsmen making post and beam-constructed buildings.
Steve Stack:
I know you enjoy woodworking yourself. We’ve talked before about the satisfaction and feeling of accomplishment when you create a piece of furniture with your hands and eyes. It could be a very simple piece of furniture. Primitive. It can be Victorian. When you know that there was no extension cord to plug in, you did it with the tools in your hands. Back in the day, they didn’t have sandpaper. They had one or two of these. Tell us about it.
Mike Jenkins:
This is a scraper. This one is interesting because it’s adjustable. You can adjust the angle to scrape down the final roughness created by your plane for a nice, smooth surface on a tabletop or any piece of furniture that needed a flat surface.
Steve Stack:
The four-sided head was very common. A triangular head is common even today on some of our curved handrail components.
Mike Jenkins:
You will see that on these, too.
Steve Stack:
You’ll get a profiled head to follow the profile of the moulding. When you drag it, it knocks down that grain, gives it that final sheen and you’re ready for finish. They didn’t do anything easy.
Mike Jenkins:
They didn’t have any way to do it easily.
Steve Stack:
Exactly. Nowadays, this would be replaced by a four-by-four or a four-inch battery-operated orbital palm sander. This was when you wanted the lighter day at work after you spent a couple of days with the cornice mould.
Mike Jenkins:
You start scraping with that for a couple of hours and your shoulders feel it.
Steve Stack:
We’ve talked our way through a lot of these tools.
Mike Jenkins:
This one is called a fourfold two-foot rule. It’s not really four-folds, but it has four legs and it’s two feet long. This is a brass-bound Stanley No. 62. There’s brass on the edge and in the interior. That means the wood doesn’t show a whole lot of wear. This was an essential tool in a carpenter’s kit. He’d frequently carry it with him.
You’ll find these in auctions or eBay with the numbers almost worn off on the outside because of pocket wear. But this is a fourfold two-foot, the next one is a fourfold one foot. It has a caliper with it, too. Depending on what your skill was or what piece you were working on, you would carry either the fourfold two-foot or the fourfold one foot.
Steve Stack:
Either one of these was at the ready in your pocket.
Mike Jenkins:
Yes.
Steve Stack:
At some point, we graduated to a new tool.
Mike Jenkins:
This is also a carpenter’s handy rule. You have to be careful the way you operate this. The first time I saw one of these, I didn’t know how to open it so I pulled it wrong. My dad’s cabinet maker was rather upset with me when it came apart. This is a six-foot-long rule and it opens up to whatever length that you need within six feet. It’s called a zigzag rule because you open it like a bunch of Zs. It’s worn but I’m sure it’s a Stanley extension rule. And then it has a caliper.
Steve Stack:
For a little more intricate work.
Mike Jenkins:
Well, for inside measure.
Steve Stack:
Yeah. Interesting.
Mike Jenkins:
That evolved into what is used frequently today called a tape measure. It’s a flexible piece of steel. You can lock it in place. Everyone building houses today will have one of these clipped to their belt.
Steve Stack:
Yes, exactly. We’ve had a nice conversation here. I appreciate you coming in and sharing your knowledge of these tools. You’re approaching 50 years of enjoying, learning and using antique woodworking tools. Folks, follow along. We’re going to have quite a few more good conversations with Mike. We make mouldings all the time. We do it a little bit differently, but I really want to try my hand at some of these smaller, more delicate moulding planes.
Mike Jenkins:
Bring in your Stanley No. 45 and we’ll learn how to use that.
Steve Stack:
We’re going to do that. I’m going to dig him out, get the wood case and bring him along. You will have to show me how to operate it. Mike, again, thank you for coming down from Kent, Ohio down to Canfield and visiting Studio 3B.
Mike Jenkins:
My pleasure, Steve.
Steve Stack:
I look forward to the next one. Thanks, buddy.
Mike Jenkins:
Me too.
Steve Stack:
For all you folks listening, thanks for talking shop with Baird Brothers Fine Hardwoods. If you’ve enjoyed this episode and wanted to stay up-to-date with the American Hardwood Advisor podcast series, give us a like and subscribe. For more tips, DIY projects, and inspiration, check us out on Facebook, Instagram, read our tweets, or visit bairdbrothers.com. Until next time.


